Showing posts with label DIY. Show all posts

Wednesday, March 6, 2013

Chic Maker


DIY jewellery kit- thanks to Chic Maker
Bracelet- made by me!

Who doesn't love a bit of DIY, but admittedly whenever I have spotted an amazing DIY project on a blog, pinterest or in a magazine, I say I love it, say I'll make it....but then it all gets a bit hard when I consider how long I might need to traipse around Bunnings, Spotlight and Lincraft to find the supplies I need.  This is where Chic Maker comes in- its an absolutely genius concept that provides all materials and instructions in a compact little kit.  When I received mine in the post, I literally sat down that evening and made it on the spot- I couldn't resist!

Chic Maker have a different jewellery project every month.


Thursday, December 22, 2011

What to wear on a long-haul flight

Tee- Ojay
Jeans- Dotti
Boots- Aldo
Scarf- Witchery
Holiday time = travel!
We've all got the outfits planned for the destination, but what to wear for the hours stuck in that airplane seat getting there...

The balance of comfort and style is such a tricky one!
BUT I have found a the perfect piece...

This is a high quality garment that looks beautiful on, and looking a little smart is no doubt the key to score an upgrade.  Being 100% lightweight merino wool this wrap doesn't crease, is highly breathable, regulates temperature annnnd doesn't smell- a bonus if you are going to be wearing this for a solid 24 hours (or more).   I have other pieces from the Icebreaker range (see my review HERE), as do friends of mine and the word is you can wear them solidly for a month and STILL no smell- it's seriously impressive stuff. 

This wrap is so warm, cosy and comfortable.  It has a front button and a sash allowing it to be worn open, buttoned or tied.  These THREE ways, as seen on me above, enable it to move easily from a cosy blanket for the flight to a really lovely piece that is perfect to continue wearing throughout your travels.  I might add it has handy big pockets too.

So what about the rest of the outfit you say... here are my tips to be jet-set ready:
  • Jeggings or leggings to maintain the comfort factor, stretchy and nonrestrictive is the idea.
  • Add a singlet and oversize cotton tee (layers to take on and off will give you more options).
  • Wear a scarf instead of jewellery to add a bit of interest to your look without setting of those metal detectors, and a little extra warmth if needed.
  • Dark colours probably won't go astray either, just in case you upend your coffee... (or that could just be me, the most clumsy person ever!)
  • Comfy flats are key, don't forget your feet might well up a bit (mine do!) so cramming those babies into heels at the end of the flight is never going to work.
  • And a cosy pair of socks is nice to have for during the flight (NatureShop have a great range which are of course 100% wool.)
  • For the hair, try a messy bun and dry shampoo will be your best friend for a non-greasy do at the end of the trip.
  • Don't forget the sunnies to hide those tired travel eyes!

I should add that the NatureShop are proud to be carbon neutral and they have FREE delivery and returns, plus a whopping 365 day return policyNatureShop are also committed to growing their charitable donations program and support a number of charities.

Be sure to join NatureShop on FACEBOOK for a chance to win every month.

p.s. All pics by me at Melbourne Airport.

Why not join me on FACEBOOK .
Would soooo love to see you there!


Saturday, May 7, 2011

DIY- Colour Block Bracelet- Part 2

Thanks a bunch for all your lovely comments on my last DIY HERE.  Here is the matching PART 2- even simpler and less materials required. 

--------------------------------
DIY COLOUR BLOCK BRACELET

Just grab your bit of rope (free from your shopping bag handle) and 3 colours of cotton. That's it! It should cost you about 10 cents.
1. Wrap the rope around your wrist twice and then hold firmly as you squeeze it off- you need to get it the right size that it won't fall off, but so you can take it on and off!
2. Wind cotton tightly around the centre point and finish by threading the cotton back through with a needle.

3. Grab a contrasting colour of cotton and then wrap tightly a short space from the centre point.  Go over the end of the rope.  Finish by threading the cotton back through with a needle.

4. Grab another contrasting colour of cotton and wrap tightly on the other side of the centre point. Go over the end of the rope.  Finish by threading the cotton  back through with a needle.


5. Voila. Hoorah you are done. EASY AS PIE!!
6. Now... Wear it!

GOOD LUCK! Let me know how you go!!

Also thank you so much for voting on my jewellery design HERE.  There is still a  little time left, to vote just click the LIKE button just under my design- THANK YOU : )

x
Michelle
Follow Michelles Style File

Thursday, April 28, 2011

DIY- Colour Block Bracelet

Firstly, thank you for all your ideas on how to wear the sizzling hot shoes from my last post.  I can't wait to show you what I come up with : )

Now to the DIY- I'm so excited about this post.  This is my first DIY tutorial- inspired by the current bold and brilliant colour block trend, and Proenza Schouler's designs  Hope you like it!  Here's a sneak peak of the final product...
Note: There will be a matching Part 2 very soon!!!

-------------------------------------------

DIY- HARDWARE & COLOUR BLOCK BRACELET

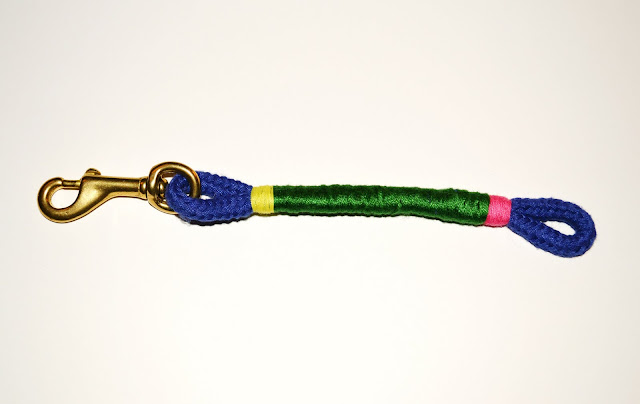
I started with the (free) purple cord from a shopping bag handle, a Cue bag in this case & found this $4 quirky brass latch at the hardware store. THEN pretty much,with no plan in mind, sat down at my outside table in the sunshine and had a muck around. I'm so pleased with the result : )

 1. Grab your materials!  Some cord, a clasp and whatever coloured cotton you like.
2. Put cord through the solid end of the clasp, cut to the right length for your wrist and start winding a contrasting cotton around, and around, and around.
3. When you get to the end, use a needle to thread the cotton back through the cord to hold in place.   
 
4. Choose a contrasting colour of cotton and at one end wind around, and around and around.
5. Once again use a needle to push the thread through the cord to hold in place.
6. REPEAT- Choose another contrasting colour of cotton and wind around, and around the other end.
7. Voila!! A colour block & Hardware bracelet:


GOOD LUCK!
I would love to hear how you go : )

 
x
Michelle
Follow Michelles Style File

Thursday, April 7, 2011

Jeans and tee

Plain ol' jeans and tee, with the comfiest weges EVER, silver jewellery and a ridiculous big bun : )

There's a pretty basic DIY that has snuck in here too... I just plaited some string and wrapped it around my wrist- easy!!
Jeans: Supre, Tee: Sportsgirl, Shoes: Tony Bianco, Necklace: Jewellery, Bracelet: gift, Watch: Swatch, String: Mitre10